>>> a = 777
>>> len(bin(a)) - 2
10
>>> bin(a)
'0b1100001001'
>>> for i in range(len(bin(a)) -2):
...   print(a >> i & 1)
【Go】ビルド時に情報を埋め込む
goでビルド時に動的に値を入れてバイナリを生成するやり方です。ビルドの引数に -ldflags "-X main.version=バージョン" をつけることで実現できます。
package main

var version string

func main() {
    println("version: " + version)
}
makeでビルド時に動的にtagを取得して埋め込むなら以下。CIとか通った段階でなんらかのサービスへのデプロイするみたいな場合でもこれ用意しておけば手間がかからずにバージョンを埋め込める。
TAG := $(shell git rev-parse HEAD)

build:
   @echo $(TAG)
  go build -ldflags "-X main.version=$(TAG)" ./app.go
【Solr】Apache Solrへ入門する
概要
今更ながらApache Solrへ入門してみたのでその辺の情報の取りまとめ記事。
目次
Apache Solrとは
Apache Solrとは、Apacheコミュニティによって開発がされているOSSの全文検索エンジン。XML、CSV、JSONなんかをインポートして使うことができる。実装自体はJavaで動かす際は1.8以上のJavaが必要です。現在は8が最新で7系もサポート期間的な扱いのようです。バイナリは以下からダウンロードできます。
ちなみにElasticsearchと同じようにLuceneをバックエンドに使っていてElasticsearchの入門書とか読んでいても登場したりする。(コアな部分は同じなのかぐらいの認識。)
Elastcisearchとの比較記事はぐぐるとめちゃめちゃHITすることからも分かる通りどっちが主流になるのかを争っていた時代があったというのが伺われますね。今ならElasticsearch一択感がとても強いです。
触ってみる(Docker)
単一のSolrサーバー環境をDockerで立ち上げてみる。本番運用する場合はSolr Cloudなるものを使うらしい。(自動フェイルオーバーとかやる唯一の方法らしくきちんとやるなら一択)
Dockerfile
FROM solr:5.3.1
docker-compose.yml
version: '3'
services:
  solr:
    build:
      context: .
      dockerfile: Dockerfile
    ports:
     - "8983:8983"
    volumes:
     - ./data:/opt/solr/server/solr/mycore
    environment:
      TZ: Asia/Tokyo
起動したら以下をクリックし管理画面を開くことができれば正常となります。メモリをそこそこ食うので手元の環境では最初エラーとなったので非力なマシンで動かす場合はある程度はメモリを開けておく必要があるので注意です。
コアを生成する
Solr Coreは、使用に必要なすべてのSolr構成ファイルを含むLuceneインデックスの実行中のインスタンスです。何をするにもこのコアが中心となります。Elastcisearchでいうindexにあたるという認識です。またRDBのスキーマに相当し、コアごとにスキーマ定義やクエリの設定を持つことができます。
$ docker-compose exec solr bash

# ちなみにcreateには以下のようなオプションがあります。conf_dirはconfをCMSで管理するなら必要なオプションです。
# –c *core_name *    Name of the core you wanted to create
# -p* port_name *  Port at which you want to create the core
# -d* conf_dir*    Configuration directory of the port

$ ./bin/solr create -c mycore

Setup new core instance directory:
/opt/solr/server/solr/mycore

Creating new core 'mycore' using command:
http://localhost:8983/solr/admin/cores?action=CREATE&name=mycore&instanceDir=mycore

{
  "responseHeader":{
    "status":0,
    "QTime":1631},
  "core":"mycore"}
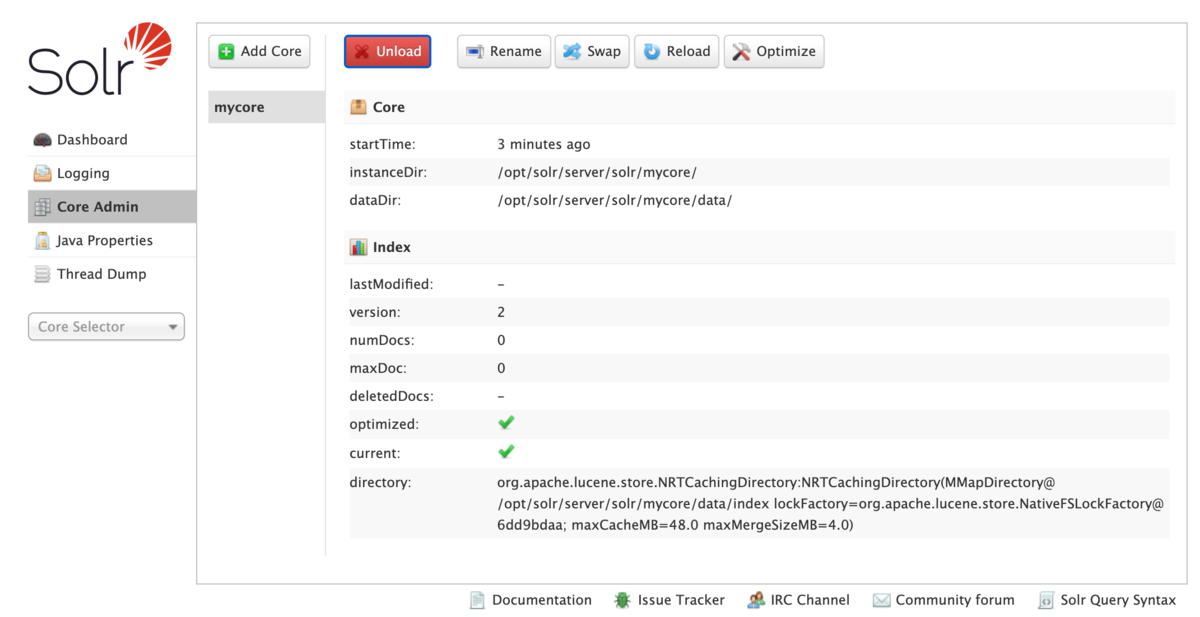
コアを生成するとadmin画面よりCore Adminに上記で作成したコアが表示されます。
http://localhost:8983/solr/#/~cores/mycore
ちなみにdelete コマンドを使用してこのコアを削除できます。誤って作成した際などはこちらを使用することで対処することが可能です。
サンプルデータを投入する
インストール時についてくるxmlを使ってサンプルデータを先ほど作成したコレクションに追加します。
$ ./bin/post -c mycore example/exampledocs/*.xml
/usr/lib/jvm/java-8-openjdk-amd64/jre/bin/java -classpath /opt/solr/dist/solr-core-5.3.1.jar -Dauto=yes -Dc=mycore -Ddata=files org.apache.solr.util.SimplePostTool example/exampledocs/gb18030-example.xml example/exampledocs/hd.xml example/exampledocs/ipod_other.xml example/exampledocs/ipod_video.xml example/exampledocs/manufacturers.xml example/exampledocs/mem.xml example/exampledocs/money.xml example/exampledocs/monitor.xml example/exampledocs/monitor2.xml example/exampledocs/mp500.xml example/exampledocs/sd500.xml example/exampledocs/solr.xml example/exampledocs/utf8-example.xml example/exampledocs/vidcard.xml
SimplePostTool version 5.0.0
Posting files to [base] url http://localhost:8983/solr/mycore/update...
Entering auto mode. File endings considered are xml,json,csv,pdf,doc,docx,ppt,pptx,xls,xlsx,odt,odp,ods,ott,otp,ots,rtf,htm,html,txt,log
POSTing file gb18030-example.xml (application/xml) to [base]
POSTing file hd.xml (application/xml) to [base]
POSTing file ipod_other.xml (application/xml) to [base]
POSTing file ipod_video.xml (application/xml) to [base]
POSTing file manufacturers.xml (application/xml) to [base]
POSTing file mem.xml (application/xml) to [base]
POSTing file money.xml (application/xml) to [base]
POSTing file monitor.xml (application/xml) to [base]
POSTing file monitor2.xml (application/xml) to [base]
POSTing file mp500.xml (application/xml) to [base]
POSTing file sd500.xml (application/xml) to [base]
POSTing file solr.xml (application/xml) to [base]
POSTing file utf8-example.xml (application/xml) to [base]
POSTing file vidcard.xml (application/xml) to [base]
14 files indexed.
COMMITting Solr index changes to http://localhost:8983/solr/mycore/update...
Time spent: 0:00:00.773
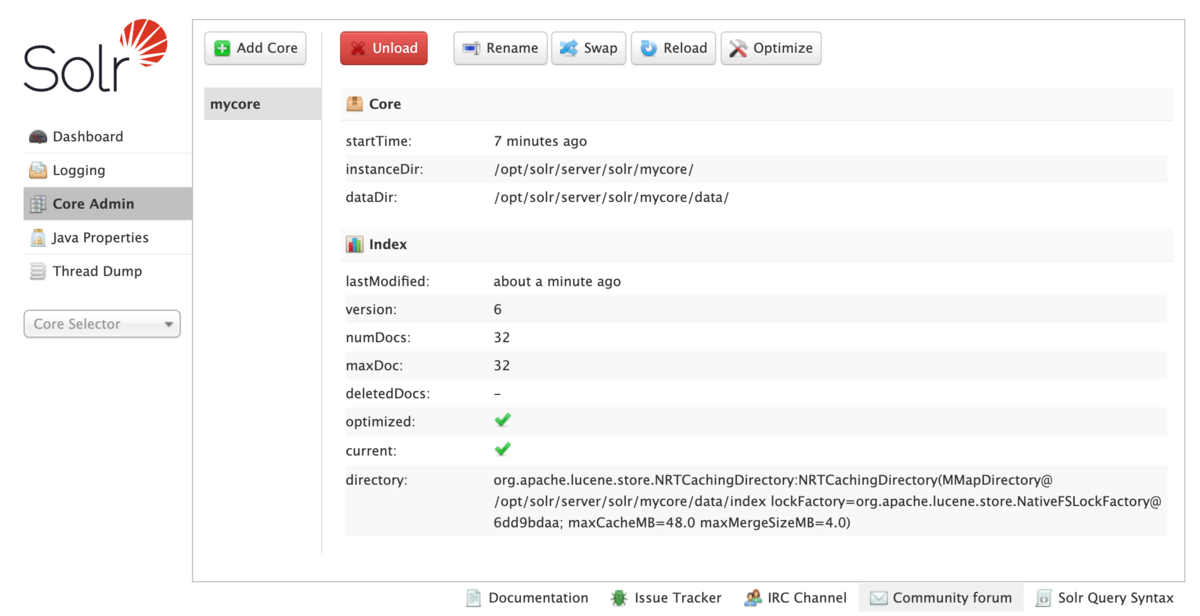
上記が成功すると先ほどのCore Amin画面のmaxDocやnumDocsが変わっていることが確認できます。
検索APIを使う
curlを使って検索APIを実行してみる。Elastcisearchと違ってクエリパラメータだけで完結できるのは個人的にはこっちの方がわかりやすくて好きかもしれない。DSLとか覚えなくてもある程度は高度なクエリもかけそうだしhttpを理解していればだいぶ理解は楽かも。
主要なクエリパラメータ以下となります。
| クエリ | 概要 | 備考 |
|---|---|---|
| q | 検索文字列 | q=Apache&df=title |
| wt | 出力フォーマット (xml, json, csv, 他) | |
| indent | 出力結果にインデントをつける | |
| rows | 一度に表示される応答の行数を制御します | デフォルト10行 |
| fl | クエリ応答に含まれる情報を、指定されたフィールドのリストに制限 |
インデントとフィールド指定したクエリを実行。正しく取れていそう。
$ curl 'http://localhost:8983/solr/mycore/select?q=id:apple&rows=10&indent=true'
<?xml version="1.0" encoding="UTF-8"?>
<response>

<lst name="responseHeader">
  <int name="status">0</int>
  <int name="QTime">1</int>
  <lst name="params">
    <str name="q">id:apple</str>
    <str name="indent">true</str>
    <str name="rows">10</str>
    <str name="wd">json</str>
  </lst>
</lst>
<result name="response" numFound="1" start="0">
  <doc>
    <str name="id">apple</str>
    <str name="compName_s">Apple</str>
    <str name="address_s">1 Infinite Way, Cupertino CA</str>
    <long name="_version_">1695484420944822272</long></doc>
</result>
</response>
スキーマの話
Solrのスキーマの属性は以下のようなものがあります。ちなみにsolrもElasticsearchみたいなスキーマレスとしてデータを扱う機能が4系から入ったらしいです。それ以前は必須だったとのことですが実運用する上でこの辺は必須な設定な気がしてます。
- name : フィールド名
- type : 型 (Solr組み込みの型の一覧)
- indexed : trueの場合、クエリで検索可能なフィールドになる (デフォルトはtrue)
- stored : trueの場合、クエリの結果に値を含めることができる (デフォルトはtrue)
- required : trueの場合、POST時の必須項目となる (デフォルトはfalse)
- multiValued : trueの場合、複数の値を持つことができる (デフォルトはfalse)
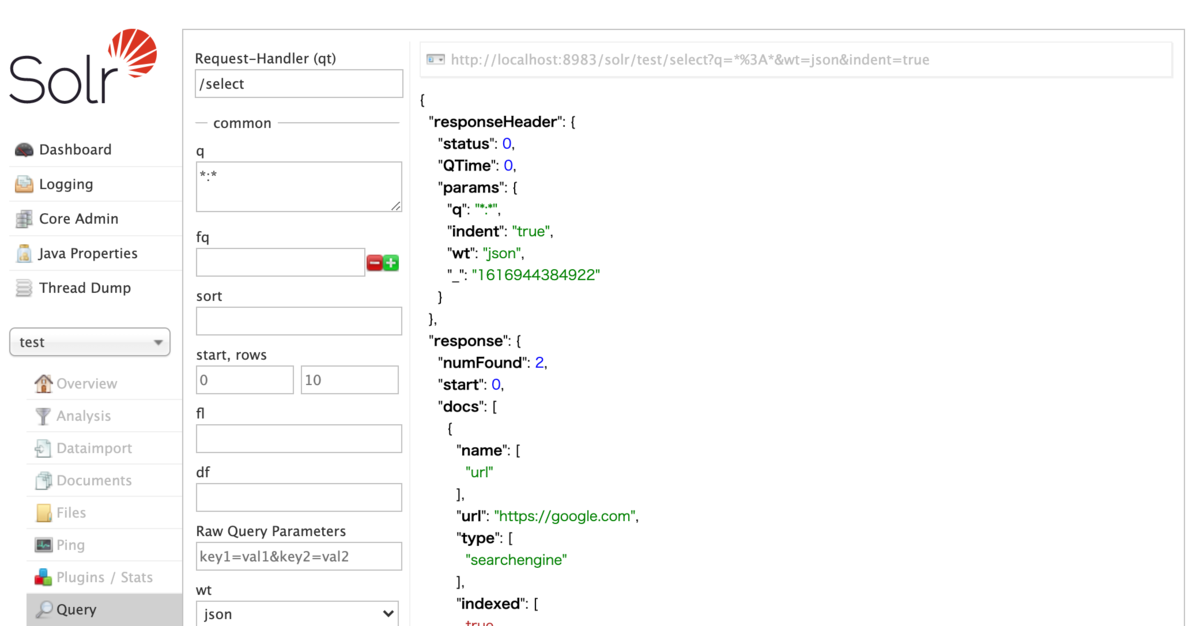
スキーマは以下のように http://localhost:8983/solr/test/schema にPOSTすることで定義できます。(ここでは予めtestというコアを作成しておきます)
curl -X POST -H 'Content-type:application/json' --data-binary '{
  "add-field": {
    "name": "url",
    "type": "string",
    "indexed": "true",
    "stored": "true",
    "required": "true",
    "multiValued": "false"
  }
}', http://localhost:8983/solr/test/schema
テストデータを作成
[
  {
    "name": "url",
    "url": "https://google.com",
    "type": "searchengine",
    "indexed": "true",
    "stored": "true",
    "required": "true",
    "multiValued": "false"
  }
]
以下のコマンドでデータをpostします。
$ curl 'http://localhost:8983/solr/test/update?commit=true&indent=true' --data-binary @test.json -H 'Content-Type: text/json'
{
  "responseHeader":{
    "status":0,
    "QTime":43}}
ちなみにPOSTはcurlを使わずとも管理画面から行うことも可能らしいです。
configの書き方
Solrの動作設定ファイルはsolrconfig.xmlとなります。コンテナでやる場合は/opt/solr/server/solr/configsets/basic_configs/conf/solrconfig.xmlこの辺にあります。
高可用性を実現するためには
solrは可用性を高めるためのソリューションを提供しています。master slaveとSolrCloudという構成があって高可用性を実現するためにはSolr Cloud一択となっているようです。
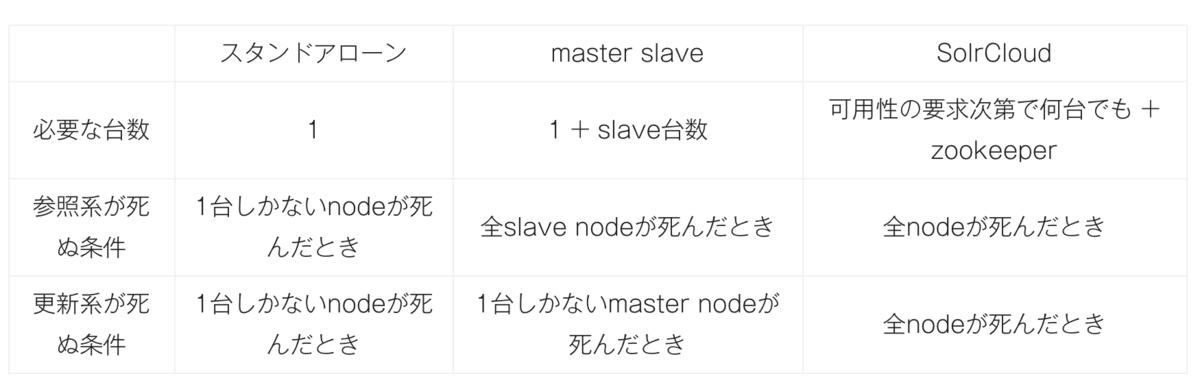
master-slave構成で可用性を高めるにはバッチでインデックスを生成するみたいな構成を取っている場合はmasterの障害中にデータをロストしないようなバッチとする必要があります。なんらなかの永続化する仕組みが間に必要となるので複雑になりそうです。
とはいえSolrCloudの方もzookeeperなど別途で必要になってくるのでこっちもこっちで複雑になりそうです。この辺はノウハウが溜まっている状況でない限りは運用は怖いかもしれないですね。。
参考記事
【Linux】curlが使うルート証明書
この辺にある。
/etc/pki/tls/certs/ca-bundle.crt
curlをverboseモードで打つと確かにそのパスを読んでるような出力がある
[root@worker001 ~]# curl -sv https://www.google.com -o /dev/null
* About to connect() to www.google.com port 443 (#0)
*   Trying 172.217.26.4...
* Connected to www.google.com (172.217.26.4) port 443 (#0)
* Initializing NSS with certpath: sql:/etc/pki/nssdb
*   CAfile: /etc/pki/tls/certs/ca-bundle.crt
  CApath: none
* SSL connection using TLS_ECDHE_ECDSA_WITH_AES_128_GCM_SHA256
* Server certificate:
*   subject: CN=www.google.com,O=Google LLC,L=Mountain View,ST=California,C=US
*   start date:  3月 11 15:00:19 2021 GMT
*   expire date:  6月 03 15:00:18 2021 GMT
*   common name: www.google.com
*   issuer: CN=GTS CA 1O1,O=Google Trust Services,C=US
ちなみに追加することも可能で以下のような手順となっているらしい。